
Introduction
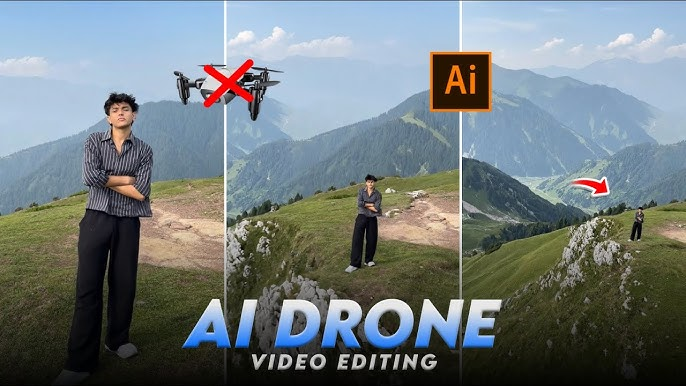
Photo To Drone Shot video Website In recent years, the fusion of photography and videography has opened new creative possibilities for visual storytellers. Among these innovations, the transformation of still photographs into cinematic drone-style videos has gained remarkable popularity. This technique—often referred to as “photo-to-drone shot animation” or “2.5D aerial motion”—allows creators to simulate the movement and perspective of drone footage using only static images. With the aid of advanced editing tools and motion graphics software, photographers and filmmakers can produce sweeping aerial visuals that rival real drone captures, even in locations where drone use is restricted or impractical.
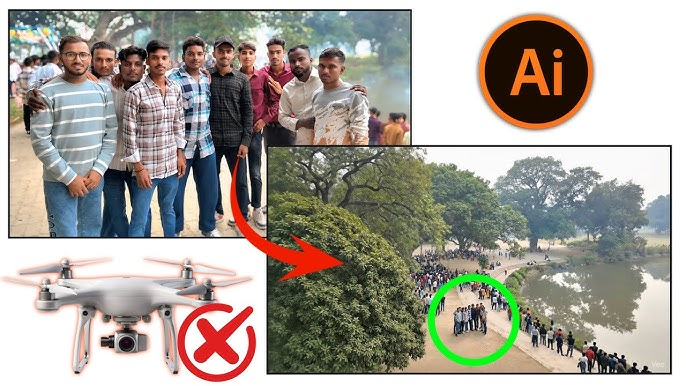
Drone videography has revolutionized visual media by offering breathtaking perspectives once accessible only through expensive aerial equipment. However, not every creator has access to a drone, nor is it always possible to fly one due to legal, environmental, or safety constraints. The photo-to-drone video technique bridges this gap, providing a creative and accessible alternative. By combining high-resolution aerial or landscape photos with motion simulation techniques—such as panning, zooming, and parallax animation—editors can craft videos that convey depth, scale, and movement with impressive realism.
🛩️ How to Make a Drone Shot Video from Photos
Creating a cinematic drone video using photos is a great way to simulate drone movement even if you don’t have full video footage. This technique—often called a “photo-to-video parallax animation” or “2.5D drone shot”—can make static images look like they were filmed from a flying drone.
1. Plan Your Concept
Before you start, decide on:
- Subject or story: What are you showcasing? (landscape, architecture, construction site, event, etc.)
- Style: Smooth aerial pan, zoom, reveal, orbit, or top-down flyover.
- Duration: Aim for short clips (5–20 seconds each).
👉 Tip: If you’re working on a longer video, plan transitions between different drone angles (top-down, forward-moving, orbit, etc.).
2. Capture High-Quality Photos
You can use:
- Drone photography: Take multiple high-resolution stills at different heights or angles using your drone.
- Ground camera or satellite imagery: If drone use is restricted, you can simulate drone shots using static aerial photos.
Tips for capturing photos:
- Shoot in RAW format for maximum detail and dynamic range.
- Maintain consistent lighting across all photos.
- For panoramic or motion-sequence shots, capture images in small increments (slightly moving between each shot).
3. Prepare Your Images
Before animation:
- Select the best photos — sharp, well-lit, and compositionally strong.
- Edit and color-correct in Adobe Lightroom, Photoshop, or Capture One.
- Adjust exposure, highlights, shadows, and clarity.
- Match colors across all images to create visual consistency.
- Export images in a resolution suitable for video — ideally 4K (3840×2160) for modern screens.
4. Animate in Video Editing Software
You’ll need a video editor or motion graphics tool that supports camera motion or keyframing, such as:
- Adobe After Effects
- DaVinci Resolve (Fusion tab)
- Final Cut Pro
- Adobe Premiere Pro
- CapCut / VN Editor / Kinemaster (for simple mobile versions)
Step-by-Step Animation:
A. Import your images
- Create a new project at 24–30 fps and 16:9 aspect ratio.
- Drag your edited photo(s) to the timeline.
B. Add motion (Ken Burns effect or 2.5D movement)
- Apply a scale and position keyframe at the start and end of the clip.
- Simulate motion such as:
- Forward fly-through: Gradually zoom in.
- Pull-back reveal: Zoom out slowly.
- Lateral pan: Move horizontally across the image.
- Tilt-up shot: Move vertically from bottom to top.
C. Add parallax for realism (optional but powerful)
- In After Effects, separate foreground, midground, and background elements using Photoshop’s “Select Subject” and “Layer Mask.”
- Import layers into After Effects and use a 3D camera to create subtle depth movement — mimicking a real drone’s motion.
5. Enhance with Transitions
To simulate drone flight between locations or scenes:
- Use cross-dissolves, zoom blurs, or whip pans between images.
- In After Effects, use a motion blur transition or lens flare burst to simulate the camera turning or moving.
- For smoother continuity, match the direction of motion (e.g., if one photo zooms forward, start the next one zooming forward too).
6. Add Atmospheric Effects
Photo To Drone Shot video Website To make the motion feel natural:
- Motion blur: Adds realism during camera moves.
- Lens flare or light leaks: Simulate sunlight glints as if from a drone camera.
- Fog, haze, or particles: Adds cinematic depth (use plugins like Red Giant or BorisFX, or free overlays).
- Depth of field: Slight blur on background layers increases realism.
7. Add Sound and Music
Sound design is critical for immersion.
- Add ambient sounds (wind, birds, waves, city noise).
- Choose cinematic background music that matches the pacing and emotion.
- Subtle drone motor sounds can enhance authenticity.
Mix your audio so that:
- Music sits around –12dB.
- Environmental sound around –18dB.
- No clipping or distortion.
8. Color Grade the Final Video
Once your animation and sound are locked:
- Apply a cinematic LUT (Look-Up Table) for consistent tone.
- Fine-tune contrast and saturation for natural outdoor tones.
- Consider color styles:
- Warm golden tones → sunset or sunrise vibes.
- Cool desaturated tones → aerial exploration or mapping.
- High contrast → tech or promotional style.
9. Export Settings
Export your drone shot video with these settings:
- Resolution: 4K (3840×2160) or 1080p (1920×1080)
- Frame Rate: 24–30 fps
- Format: MP4 (H.264 codec for smaller file) or MOV (ProRes for high quality)
- Bitrate: 10–20 Mbps for 1080p; 40+ Mbps for 4K
10. Optional – Combine Multiple Photos for Drone Flyover Effect
If you have multiple photos taken at incremental heights:
- Arrange them sequentially in your timeline.
- Add a crossfade or morph transition between each.
- Match exposure and alignment (use stabilization or alignment tools).
- Add a slight zoom or pan across the entire sequence for continuous movement.
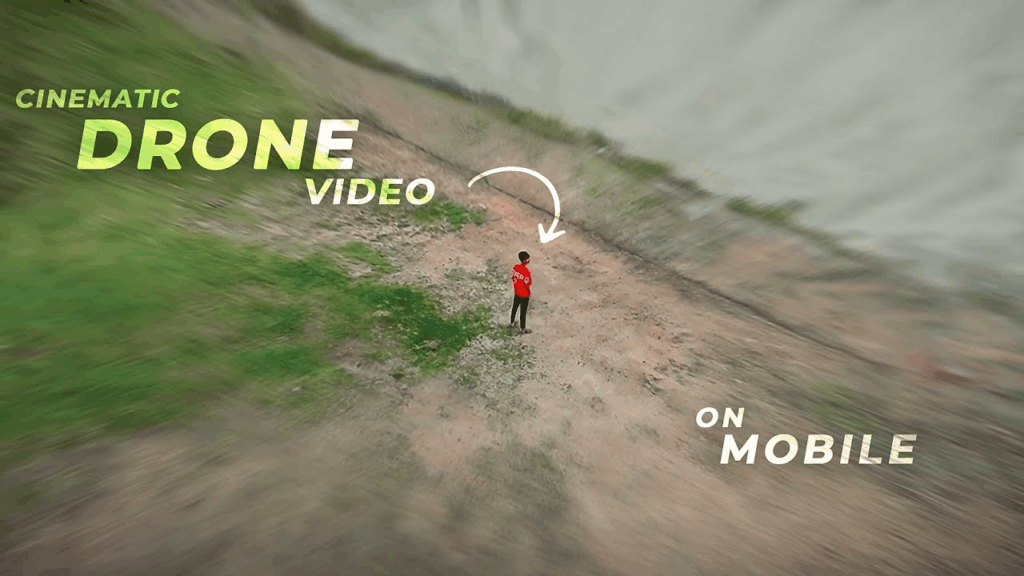
This creates a simulated drone flight path — great for construction progress videos, landscape storytelling, or real estate previews.
11. Using AI Tools for Photo Animation
AI-powered software can automate some of these effects:
- Runway ML, Pika Labs, or Kaiber AI can animate static drone photos into realistic videos.
- Photoshop’s Generative Fill + After Effects can create missing areas when adding parallax depth.
- Topaz Photo AI can enhance resolution and clarity before animation.
This approach is increasingly popular for creators who want cinematic results without piloting a drone.
12. Practical Example Workflow
Let’s go through a practical mini-project example:
Project: Simulate a drone flyover of a coastal cliff using one high-res photo.
Steps:
- Import photo into Photoshop.
- Separate foreground rocks, ocean, and sky into layers.
- Export layers into After Effects.
- Create a 3D camera layer and position layers at different Z-depths.
- Animate the camera moving forward and slightly upward.
- Add light rays and gentle fog to simulate drone altitude.
- Add ambient ocean sounds and cinematic music.
- Export as 10-second 4K video clip.
Result: A photo that feels like a live drone shot.
13. Creative Applications
- Travel Vlogs: Simulate drone footage where drones can’t fly (restricted zones).
- Real Estate Videos: Create aerial showcases from photos taken at different angles.
- Documentaries: Animate historical or archival aerial photos.
- Construction / Surveying: Create progress flyovers using time-lapse photos.
- Social Media Content: Quick, cinematic drone reveals for Reels, TikTok, or YouTube Shorts.
14. Common Mistakes to Avoid
| Mistake | Why It Hurts | Fix |
|---|---|---|
| Too much zoom or pan | Looks fake and dizzying | Keep camera moves slow and subtle |
| Uneven lighting between photos | Breaks realism | Match tone/exposure before animation |
| No parallax layers | Feels flat and lifeless | Separate depth layers for 3D motion |
| Overusing effects | Distracts from subject | Keep it cinematic, not flashy |
| Low-resolution images | Causes pixelation | Always use high-res photos |
15. Recommended Tools Summary
| Stage | Tools |
|---|---|
| Photo Editing | Adobe Lightroom, Photoshop, Snapseed |
| Video Editing | Premiere Pro, DaVinci Resolve, Final Cut Pro |
| Animation | After Effects, Runway ML, CapCut (mobile) |
| Effects & LUTs | Red Giant Universe, Filmora FX, LUTs.io |
| Sound & Music | Epidemic Sound, Artlist, Freesound.org |
16. Workflow Optimization Tips
- Use keyboard shortcuts in your editor for faster keyframing.
- Keep a consistent aspect ratio across all photos.
- Render previews at lower resolution to save time.
- Use proxies for large image files in 4K editing.
- Always save project versions — animation can be trial and error.
17. Export and Share
Once the video looks natural:
- Add your logo or watermark in a corner.
- Include titles or captions (e.g., “Aerial View of Bali Coast”).
- Export in different aspect ratios:
- 16:9 for YouTube
- 9:16 for TikTok/Reels
- 1:1 for Instagram feed
Finally, test playback on multiple devices to ensure color and motion look smooth.
18. Drone Simulation Techniques
If you want to mimic specific drone maneuvers using photos, here’s how:
| Drone Movement | How to Simulate |
|---|---|
| Fly Forward | Slow zoom-in + subtle camera tilt |
| Pull Back Reveal | Zoom-out from center with easing |
| Orbit Shot | Slight rotational pan + parallax layer shift |
| Top-Down Descent | Vertical pan + zoom-in combination |
| Tilt-Up Reveal | Move from bottom to top + increase exposure or light |
Combine these to create believable drone transitions between stills.
19. The Art of Motion
Photo To Drone Shot video Website Remember, the essence of drone cinematography is graceful motion and perspective.
Even though you’re using still photos, your goal is to simulate aerial storytelling — height, distance, and emotion.
Use the “Ease In / Ease Out” animation curve to make movements smooth, like a drone gradually starting and stopping.
20. Final Thoughts
Turning photos into drone-style videos is a powerful way to produce cinematic aerial visuals without flying a drone or shooting live footage. It combines:
- The composition of photography,
- The motion of cinematography, and
- The illusion of depth created through animation.
Conclusion
Creating a drone shot video from photos is both a technical craft and a creative art form. It bridges the gap between still photography and cinematic storytelling, allowing creators to simulate stunning aerial perspectives without needing to capture live drone footage. Through careful planning, precise editing, and thoughtful animation, a single static image can be transformed into a dynamic visual experience that mimics the motion, depth, and emotion of real drone cinematography.
This process relies on key stages: capturing or selecting high-quality aerial photos, editing them for consistency, animating them through motion or parallax effects, and enhancing the result with transitions, sound, and color grading. The outcome depends not only on technical skill with software like Adobe After Effects, Premiere Pro, or DaVinci Resolve but also on artistic sensitivity—understanding composition, lighting, pacing, and movement.
Link Here
Photo To Drone Shot video Website In essence, the creation of a drone shot video from photos represents how modern visual storytelling continues to evolve. It shows that creativity is not limited by equipment, but expanded by imagination and technique. Whether for filmmaking, real estate, travel, or social media, this method empowers photographers and editors to bring their images to life—turning still moments into cinematic journeys that capture the viewer’s sense of flight and wonder.